I love the simplicity of this card that showcases the message of the Christmas season. It features one of the Single Stamps that are available until the end of January. Click on Single Stamps to go to my on-line store to see all of the available stamps. Supplies for this card include the Prince of Peace stamp, Night of Navy ink and card stock,Very Vanilla card stock, Gold Foil Sheets, gold glitter and the Deco Label Framelits, Tasteful Trim Die, Square Lattice Embossing Folder. .
I hope all of you had a wonderful Thanksgiving! It's hard to believe that Christmas is less than 2 weeks away! I swear it was only November 1st yesterday! Sigh....I still have Christmas cards to make and mail...do you? I thought I was so clever coming up with a Washi Tape Christmas Tree card....until someone told me several bloggers have posted similar projects! Anyway, here is my version! Using the Pennant Die, die cut the largest triangle. I found it easiest to start at the bottom of the tree and work my way up, alternating different designs of Washi Tape. Be careful not to overlap the different designs since the tape is somewhat sheer. I also recommend you wrap the tape around the edges for a cleaner look. The tree is popped up with Stampin' Dimensionals. The greeting is from More Merry Messages stamp set. A quick and easy card! You make several in a short period of time!
Late last week I received an invitation to set up a vendor table at a Halloween event at our local YMCA. The event was late Saturday afternoon. They were expecting several hundred kids and their parents. Vendors were either asked to have a craft prepared for the kids to make, or provide a Halloween treat. I literally had one day to prepare so I knew prepping a craft for over 200 kids was out of the question! I hadn't put together my Halloween Banner from the Holiday catalog yet so thought it would make a perfect table decoration. It came together easily and quickly! So if you are looking for a fast decoration, this is definitely it!
Next I pulled a basket out of my stash for my treats. It clearly needed some Halloween decorations so pulled out Owl Builder Punch for some bats and ghosts, die cut a bow and embellished it and the basket handle with some Halloween Washi tape and Voila!
It was fun watching the kids parade by in their costumes! And it was great introducing some paper crafters to Stampin' Up! Yep, believe it or not, there were many crafters who stopped by my table that had never heard of Stampin' Up! I do believe I have some new stamping friends!
The collage technique is one of my favorites - it lends itself to any occasion, any person. And I'm still in love with Best of Autumn!
Supplies: Naturals Ivory and Old Olive card stock; Tangerine Tango, Baked Brown Sugar and Old Olive ink; Burlap Ribbon, Chalk Talk Framelits
Note: The leaf that is popped up was stamped with Old Olive and sponged with Baked Brown Sugar and Tangerine Tango. After "fussy-cutting", the edges were sponged with Baked Brown Sugar as well.
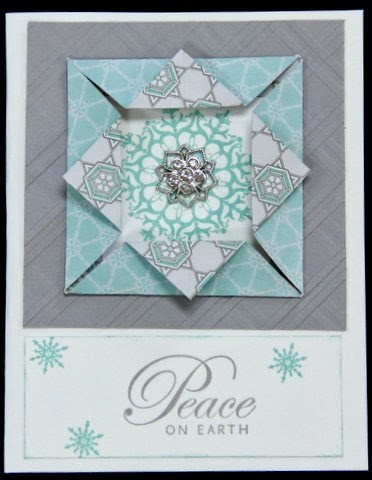
I recently participated in a design challenge for Michigan Scrapbooker Magazine. I was asked to design a gift box from page 158 in the annual catalog. Here is what I submitted - hope you like it! The focal point is a layered piece - the bottom layer is a doily (scrunched up a bit). Using Festive Flurry stamps and Framelits, I stamped and die cut 2 different sized snowflakes and sandwiched a 1 3/4" Silver Glimmer Paper circle between them (all layers are stacked with Stampin' Dimensionals between them). The card stock and ink are Soft Sky.
This card reminds me of leaves falling from the trees...
Supplies: Baked Brown Sugar card stock and ink; Early Espresso card stock and ink; Naturals Ivory card stock; Versamark Ink; Antique Brads; Soft Suede Taffeta Ribbon; Best of Autumn stamp set
My grandaughter, Elise, turns five years old tomorrow. Here is the card I sent her. I will confess I was in a hurry so would certainly change a few things. My inspiration for this card came from Elise herself! She loves to sing and dance and I can just hear her singing "10 little monkeys jumping on the bed, one fell down and broke his head!..."
Cute, huh? And super easy! The Tag a Bag makes a great treat bag! The witch's hat (embossed with Black Stampin' Emboss Powder)is from Best of Halloween, the "trick or treat" is from Tags 4 You, Deco Label Collection Framelits outlined with the Black and Orange Stampin' Glitter, and the ghost is the Owl Builder Punch embossed with Iridescent Ice Stampin' Emboss Powder.
I am really loving the Magnificent Maple stamp from the Holiday Catalog! There are several techniques that you can use which makes this stamp really versatile! My mom's birthday is on Monday and Fall is her favorite time of year so it all just came together! The leaves are embossed with Early Espresso and burnished with Always Artichoke, Crushed Curry and Cajun Craze. The Vanilla cardstock is embossed with the Woodgrain Embossing Folder and lightly sponged with Early Espresso ink. The greeting is from Express Yourself Hostess set.
I've been doing a series of Technique Classes for customers and have been going through techniques I haven't done in a while. So the "Oh yeah, I remember this one" was the first thing I thought of when I pulled out the Emboss Resist instruction sheet. In addition to making the technique card, we also make a card using that technique.
Supplies used: Night of Navy & Whisper White card stock, Night of Navy; Versamark & Marina Mist Ink; White Embossing Powder (Clear embossing powder will work as well); Festive Flurry Stamps & Framelits; Greetings of the Season; Rhinestones.
This is a fun embellishment for any occasion. With Christmas just a few months away, I've been working on Christmas cards for various events. Be sure to scroll down and watch the video tutorial as well!
Our grandson, Thomas, turned 10 years old yesterday. I kind of struggled with his birthday card because he isn't a "little kid" anymore and I don't have a lot of stamps that would appeal to a boy his age. And then along comes Paper Pumpkin to save the day! August's kit had this cute bike stamp so Voila! Happy Birthday Thomas! Log on to www.mypaperpumpkin to start your subscription!
There are a lot of items in the Thankful Tablescape Simply Created Kit...and it can be used for more than just decorating for Thanksgiving! Our family has a lot of birthdays in September so thought I would use some of the kit to make some birthday cards. The background paper that looks like the bark of a birch tree is great for Fall and even Winter themed cards.
September's Paper Pumpkin arrived yesterday so this morning I opened it. One of the things I love about Paper Pumpkin is that you can whip up the four cards very quickly so when you need a card, it's all done. The other thing I love is that you can use pieces of it and create different projects. (To order your subscription, go to www.mypaperpumpkin.com) OK...back to this month's kit - the first thing I saw was...a spider web!! Right?? So after putting together a card as intended, I made another one....
I am leaving bright and early tomorrow morning for San Diego - courtesy of Stampin' Up! I earned the Weekend Get-a-Way so I am treating my husband to a well deserved trip. I'll post when I get back but wanted to leave you with a project that will be part of a Christmas Card Class next week.
It is made with the Label Thinlit and Whisper White card stock. I embossed the smallest snowflake from Festive Flurry with Heat & Stick powder, and Gold Stampin' Glitter on one of the Gold Foil Sheets and die cut it with the Festive Flurry Framelit. I embossed the right edge of the card with a Delicate Designs folder. I finished it off with some Silver 1/8" Ribbon and a Frosted Finishes Embellishment.
One of my fellow demonstrators, Mary Ellen Stites, posted this technique so I thought I would give it a go. Very fun! Punch out a circle from a post-it note (be sure to catch the sticky part!), and stick it on your card stock. Mark the center with dot as this will be your focal point. Using daubers and ink, line up a piece of cardboard with the focal point and move out toward the edge of the card stock to create the sun's rays. Fill in the sky and the sun as desired and add any other elements you wish. I used Lovely as a Tree and the greeting is from Teeny Tiny Wishes. Colors are Crisp Cantaloupe, Old Olive, Early Espresso and So Saffron.
I am having so much fun with these new Thinlits! You can uses pieces from each set so you get even more flexability with designing cards! Try it - you'll like it!!
Supplies: Coastal Cabana, Basic Gray, Crushed Curry, Whisper White card stock; Basic Gray & Calypso Coral, Crushed Curry Classic Ink; I Am Me DSP; Sweets For The Sweet Stamp Set; Mini Silver Brad; Circle Thinlit (but the arrow is from the Label Thinlit)
Well...at least for now my new favorite stamp is Gorgeous Grunge. This stamp set is very versatile! Our oldest grandson turned 17 last week and he is hoping to attend the University of Michigan when he graduates from High School. So it was pretty easy choosing colors - Crushed Curry and Night of Navy close to Maize and Blue!The Happy Birthday greeting is from You're Amazing stamp set.
I wasn't quite sure what to call this card! But it sure is fun to make! I've posted a link to the video tutorial following the photo images. Happy Stamping!
My Best of Halloween stamp set arrived the other day and I just love the witches hat!
Supplies: Basic Black & Whisper White card stock; Epic Day This & That DSP; Basic Black 1/8" Taffeta Ribbon; Black Stazon ink & Tangerine Tango marker; Neutrals Candy Dots & Basic Rhinestones
Whew! I did it! I have entered the world of video tutorials! I decided to start with a technique I haven't done in awhile - Stained Glass. Hope you enjoy it!
Here is the video:
Supplies: Old Olive, Basic Black, Vellum & Whisper White Card Stock; Pleasant Poppies &Simply Sketched stamp sets; Oval and Scallop Oval punches; Assorted Stampin' Write Markers; Whisper White Organza Ribbon; Dazzling Details


